Bayview Escarpment

The Art of Colour Matching

Share This Post

Colour matching takes patience

I was asked to build a Stickley-style (mission) white oak bench, but then approximate the colour of that bench to an existing piece in the house.

That piece was imported from a manufacturer in the USA, and large manufacturers do not use the kinds of stains that you would find in your local hardware store, which are called wipe-on stains.

Very often, to speed up production and to produce consistent results regardless of the character of the wood, manufacturers use solvent-based Non Grain Raising stains. These are sprayed on and the carrier solvent quickly “flashes” off. These are perfect for making every piece of wood, plywood, and MDF the same colour. Alternatively, they may use custom wipe-on stains that will very often have higher levels of solids than the stains that you find locally.

The basics of wipe-on stains

Wipe-on stains consist of two basic parts: a dye and solids. As you would expect, the dye soaks into the wood, imparting a colour, while the solids sit on top of the wood and collect in the open grains of woods such as oak and ash, providing an accent. Retail stains typically have relatively low amounts of solids as compared to production stains. This means that the resultant colour is less intense. These wipe-on  stains can be either solvent or water-based, each with its own advantages and disadvantages. I personally find that the solvent-based stains provide a more vibrant colour and do not raise the grain, but there are times when water-based stains are included in the finish plan.


Developing the palette

I find that the best way to approach stain matching is to first understand the natural and colour of the wood underneath. This can be a challenge with pieces imported from outside North America as the oaks from Asia, for example, will be of a different hue than those of North America., However, the base colour matters as all but the darkest stains are translucent and will allow the underlying colours to shape the final colour. You then need to visually tease out the dominant and secondary tones in an effort to determine what colours you want to include in the final mix. You also need to use a wood of similar hardness and grain characteristics. Open grained woods such as oak and ash will capture the pigments whereas closed grained woods, such as the maples, will not. Furthermore, the softer the wood the more dye will be absorbed, so woods of differing hardness will respond very differently.

The Mission Bench Case Study

Dying the bench to establish the desired undertones and to deepen the overlying stain intensity.
The stain sample, a custom colour from a US-based manufacturer, against the final bench finish. A good approximation. You can see how differences in the grain change the overall look.

In the case of the mission bench, both the original piece and this piece were constructed from North American white oak. The original piece, however, was made from quarter sawn lumber while the bench used standard flat cut lumber. Quarter sawn lumber has a more dramatic grain pattern as the boards are cut effectively perpendicular to the growth rings.

Fortunately, I was able to obtain a stained wood sample from the manufacturer, allowing me to work with it in the shop. It is impossible to match colours using images on a screen.

After playing with various wood (analine) dyes and a mix of commercial wipe-on stains, I decided to first dye the bench to approximate the colour of red oak, imparting a light orange-red undertone. This required the wood first be wetted and then sanded lightly, raising and flattening the grain before applying the water-based dye.

The piece was then stained with a 45/55 mix of Goudy Colonial Cherry (filling the grain with dark red pigment, manufactured in Toronto) and Minwax Gunstock, providing more orange. Once dry, I opted for a coat of pure Minwax Gunstock as I wanted to further highlight the orange. The second coat of stain provides a richer deeper colour but only has a secondary effect on the final colour, so the order that they are applied matters.

Once dry, the bench was coated with four coats of custom chair finish, which is wiped on, eliminating the risk of drips and pooling of the top coat. A favourite among chair makers, this finish is also very forgiving and allows for minor repairs to be made without needing to strip the piece first.

More To Explore

The Art of Colour Matching

Colour matching takes patience I was asked to build a Stickley-style (mission) white oak bench, but then approximate the colour of that bench to an

Read More »

Maple dresser with fluting

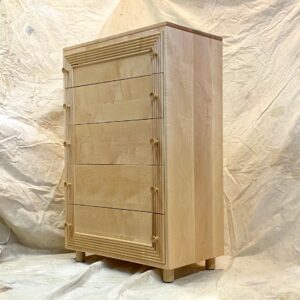
Five Drawer Maple Dresser This five drawer solid maple dresser features a fluted frame on the front, adding a little visual interest in an otherwise

Read More »

Designer and Craftsman

I create custom handcrafted furniture design to fit your style and life.